はじめに
この記事はNode.js Advent Calendar 2016の16日目の記事です。
やりたいこと
ごくたまにNode.jsでバッチを書く機会があります。ですが、ちょっとしたスクリプトを書くならいざしらず、ある程度ちゃんと書かないといけない場合の資料がネット上に少ないような気がしました。
そのため、自分流ですがこういう風に書いているというのを簡単にまとめました。
ちなみに、この記事のサンプルコードのGitリポジトリは以下です。
環境
- node.js : v6.9.1
- npm : 4.0.5
- Jenkins : 2.26
- あとはnode.jsのライブラリ
gulp.js
バッチを作るときもgulp.jsを使って、watchを常に起動させています。
gulpfileはだいたい以下のようにlintとユニットテストを登録しています。そして、coffeescriptで書いています。(gulpfile.coffee)
gulp     = require 'gulp'
eslint   = require 'gulp-eslint'
plumber  = require 'gulp-plumber'
mocha    = require 'gulp-mocha'
gutil    = require 'gulp-util'
istanbul = require 'gulp-istanbul'

files =
  src:  './src/*.js'
  spec: './test/*.js'

gulp.task 'lint', ->
  gulp.src files.src
    .pipe plumber()
    .pipe eslint()
    .pipe eslint.format()
    .pipe eslint.failAfterError()

gulp.task 'test', ->
  gulp.src files.spec
    .pipe plumber()
    .pipe mocha({ reporter: 'list' })
    .on('error', gutil.log)

gulp.task 'pre-coverage', ->
  gulp.src files.src
    .pipe plumber()
    .pipe(istanbul())
    .pipe(istanbul.hookRequire())

gulp.task 'coverage', ['pre-coverage'], ->
  gulp.src files.spec
    .pipe plumber()
    .pipe(mocha({reporter: "xunit-file", timeout: "5000"}))
    .pipe(istanbul.writeReports('coverage'))
    .pipe(istanbul.enforceThresholds({ thresholds: { global: 60 } }))

gulp.task 'watch', ->
  gulp.watch files.src, ['test', 'lint']
  gulp.watch files.spec, ['test']
そして、ソースコードを修正したらlintとユニットテストを、テストコードを修正したらユニットテストのみを走らせています。
.eslintrcは以下のように設定していて、airbnbのスタイルでチェックしています。また、airbnbのスタイルはnode.jsでの実行を想定していないので、eslint-plugin-nodeも入れています。
{
  "extends": ["airbnb", "plugin:node/recommended", "eslint:recommended"],
  "plugins": ["node"],
  "env": {
    "node": true
  },
  "rules": {
  }
}
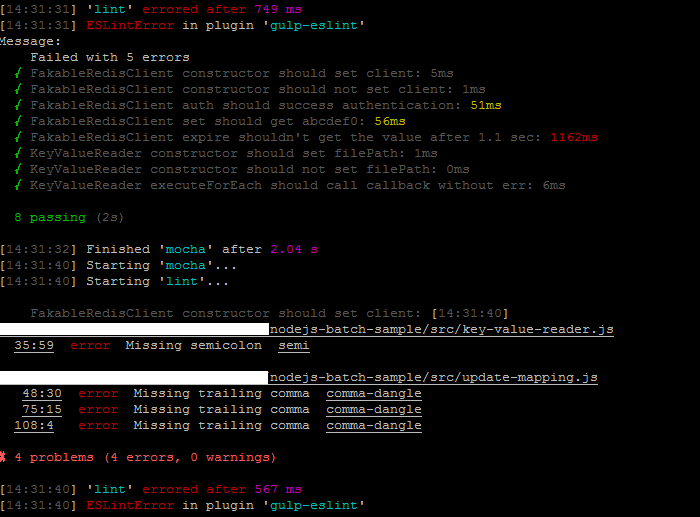
lintを実行させると以下のように出力され、私は結構指摘されるのでスタイルが統一される感を感じられて気持ちいです。
$ ./node_modules/.bin/gulp lint
[08:57:09] Requiring external module coffee-script/register
[08:57:10] Using gulpfile ~/nodejs-batch-sample/gulpfile.coffee
[08:57:10] Starting 'lint'...
[08:57:11]
~/nodejs-batch-sample/src/redis-client.js
   69:15  error  Missing trailing comma               comma-dangle
   84:58  error  Missing semicolon                    semi
   88:21  error  Strings must use singlequote         quotes
   91:23  error  Strings must use singlequote         quotes
   95:34  error  Expected '===' and instead saw '=='  eqeqeq
   98:1   error  Trailing spaces not allowed          no-trailing-spaces
  101:4   error  Missing trailing comma               comma-dangle

✖ 7 problems (7 errors, 0 warnings)

[08:57:11] 'lint' errored after 768 ms
[08:57:11] ESLintError in plugin 'gulp-eslint'
メインパート
この記事ではサンプルとして、RedisにファイルからKeyとValueのペアを読み込んで書き込む、という処理をするだけのバッチ を書きます。
エントリポイントとなるjs (update_mapping.js) は以下です。
// ===== Preparing ===============================

// Libraries
const Async = require('async');
const Log4js = require('log4js');
const Mailer = require('nodemailer');
const CommandLineArgs = require('command-line-args');

// Dependent classes
const FakableRedisClient = require('./fakable-redis-client');
const KeyValueReader = require('./key-value-reader');

// Logger
Log4js.configure('./config/logging.json');
const logger = Log4js.getLogger();

// Command line arguments
const optionDefinitions = [
  { name: 'env', alias: 'e', type: String },
  { name: 'fakeredis', alias: 'f', type: Boolean },
];
const cmdOptions = CommandLineArgs(optionDefinitions);

const targetEnv = cmdOptions.env ? cmdOptions.env : 'staging';
const fakeRedisFlg = cmdOptions.fakeredis;
logger.info('[Option]');
logger.info('  > targetEnv :', targetEnv);
logger.info('  > fakeRedisFlg :', fakeRedisFlg);

// App config
const conf = require('../config/app_config.json')[targetEnv];

if (!conf) {
  logger.error('Please add', targetEnv, 'setting for app_config');
  process.exit(1);
}

// Alert mail func
const transporter = Mailer.createTransport(conf.alertMail.smtpUrl);
const sendAlertMail = (err, callback) => {
  const msg = err.message;
  const stackStr = err.stack;

  const mailOptions = {
    from: conf.alertMail.from,
    to: conf.alertMail.to,
    subject: conf.alertMail.subject,
    text: conf.alertMail.text
  };
  mailOptions.subject = mailOptions.subject.replace(/#{msg}/g, msg);
  mailOptions.text = mailOptions.text.replace(/#{msg}/g, msg);
  mailOptions.text = mailOptions.text.replace(/#{stack}/g, stackStr);
  transporter.sendMail(mailOptions, (e) => {
    if (e) logger.error(err);
    callback();
  });
};

// Function when it catches fatal error
process.on('uncaughtException', (e) => {
  logger.error(e);
  sendAlertMail(e, (() => { process.exit(1); }));
});

// ===== Main Logic ==============================
logger.info('START  ALL');

// Initialize classes
const redisCli = new FakableRedisClient(
  conf.redis.hostname,
  conf.redis.port,
  conf.redis.password,
  logger,
  fakeRedisFlg
);

const keyValueReader = new KeyValueReader(conf.keyValueFilePath);

Async.waterfall([
  // 1. Redis Authentication
  (callback) => {
    logger.info('START  Redis Authentication');
    redisCli.auth(callback);
  },
  // 2. Insert all mapping got by 1st step
  (callback) => {
    logger.info('FINISH Redis Authentication');
    logger.info('START  Upload Key-Value Data');
    // Define function
    const expireSec = conf.redis.expireDay * 24 * 60 * 60;
    const processFunc = (key, value, processLineNum, skipFlg) => {
      const keyName = conf.redis.keyPrefix + key;
      if (skipFlg) {
        logger.warn('  > Skip : key=>', keyName, 'value=>', value);
      } else {
        if (Math.floor(Math.random() * 1000) + 1 <= 1) {
          logger.info('  > Key/Value/Expire(sec) sampling(0.1%):', keyName, value, expireSec);
        }
        redisCli.set(keyName, value);
        redisCli.expire(keyName, expireSec);
        if (processLineNum % 10 === 0) logger.info(processLineNum, 'are processed...');
      }
    };

    // Read key-value data and upload them to Redis
    keyValueReader.executeForEach(processFunc, callback);
  }
], (e, result) => {
  logger.info('FINISH Upload Key-Value Data');
  if (e) {
    logger.info('Finished to insert:', result);
    logger.error(e);
    sendAlertMail(e, (() => { process.exit(1); }));
  } else {
    logger.info('Finished to insert:', result);
    logger.info('FINISH ALL');
    process.exit(0);
  }
});
この部分は毎回ほぼ一緒で、以下のような処理の流れになっています。
- Loggerの設定(log4jsを使っています)
- コマンドラインオプションの解析(command-line-argsを使っています)
- コンフィグファイルの読み込み(ただのjsonファイルを読み込んでいるだけです)
- アラートメールの設定(nodemailerを使っています)
- 全体のエラーハンドリングの設定
- ビジネスロジックの処理(asyncのwaterfallで順に実行させています)
log4jsの設定ファイルとアプリケーションの設定ファイルは以下です。
{
  "appenders": [
    { "type": "console" }
  ]
}
{
  "staging" : {
    "keyValueFilePath" : "./data/key-value.dat",
    "redis": {
      "ip": "stg-sample",
      "port": 6379,
      "password": "nodejs",
      "keyPrefix" : "key-",
      "expireDay": 1
    },
    "alertMail": {
      "smtpUrl": "smtp://mail.sample.com:25",
      "from": "from@sample.com",
      "to": "to@sample.com",
      "subject": "[STG][ERROR][update-mapping] #{msg} @stg-host",
      "text": "[Stack Trace]\n #{msg} \n #{stack} \n[Common Trouble Shooting Doc About This Batch]\nhttp://sample-document.com/"
    }
  },
  "production": {
    "keyValueFilePath" : "./data/key-value.dat",
    "redis": {
      "ip": "pro-sample",
      "port": 6379,
      "password": "nodejs",
      "keyPrefix" : "key-",
      "expireDay": 7
    },
    "alertMail": {
      "smtpUrl": "smtp://mail.sample.com:25",
      "from": "from@sample.com",
      "to": "to@sample.com",
      "subject": "[ERROR][update-mapping] #{msg} @pro-host",
      "text": "[Stack Trace]\n #{msg} \n #{stack} \n[Common Trouble Shooting Doc About This Batch]\nhttp://sample-document.com/"
    }
  }
}
ログでは標準出力にしか出していませんが、ログの圧縮やローテーション処理はlogrotate(この設定ファイルはリポジトリにはありません)でやるようにしています。
ビジネスロジックのパートでは、FakableRedisClientというクラスとKeyValueReaderというクラスの2つのクラスを使っています。
ユニットテストをやるために、ビジネスロジックのパートは可能な限りクラスのインスタンスを作って、メソッドを呼び出すだけにするようにしています。
次にそれぞれのクラスとそのユニットテストコードを紹介します。
FakableRedisClientクラス
RedisやDBなどを使う場合はユニットテストとドライランしやすいように、モックを差し込めるように作っています。
sinonでテストコードから差し込んでテストすることもできますが、実際に本番サーバで稼働前に確認したい場合があるので、デプロイ用のコードにモックを差し込む機構を入れるようにしています。
コード (fakable-redis-client.js) は以下です。
const Redis = require('redis');
const FakeRedis = require('fakeredis');

class FakableRedisClient {

  /**
   * Setting parameters and create Redis client instance
   * @param {string} hostname - Redis server host name
   * @param {number} port - Redis server port number
   * @param {string} password - Redis server password
   * @param {Object} logger - logger for error logging
   * @param {boolean} fakeFlg - if it's true, use fake
   */
  constructor(hostname, port, password, logger, fakeFlg) {
    this.logger = logger;
    this.password = password;
    this.redisFactory = Redis;
    this.client = undefined;

    if (fakeFlg) this.redisFactory = FakeRedis;

    // Validation
    if (!/^[0-9a-z.-_]+$/.test(hostname)) return;
    if (isNaN(port)) return;

    // Create instance of redis client
    try {
      this.client = this.redisFactory.createClient(port, hostname);
      this.client.on('error', (e) => { this.logger.error(e); });
    } catch (e) {
      this.logger.error(e);
      this.client = undefined;
    }
  }

  /**
   * Authentication
   * @param {Object} callback - callback function which is called at the end
   */
  auth(callback) {
    const logger = this.logger;
    this.client.auth(this.password, (e) => {
      if (e) {
        logger.error(e);
        callback(e);
      } else {
        callback(null);
      }
    });
  }

  /**
   * Set key-value pair
   * @param {string} key - key-value's key
   * @param {string} value - key-value's value
   */
  set(key, value) {
    this.client.set(key, value);
  }

  /**
   * Set key-value expire
   * @param {string} key - key which will be set expire
   * @param {number} expireSec - expire seconds
   */
  expire(key, expireSec) {
    this.client.expire(key, expireSec);
  }

  get(key, callback) {
    this.client.get(key, (e, value) => {
      if (e) {
        this.logger.error(e);
        callback(e, null);
      } else {
        callback(null, value);
      }
    });
  }
}

module.exports = FakableRedisClient;
Redisの場合はfakeredisというライブラリがあるので、コンストラクタの引数に応じて、それを使います。
テストコード (fakable-redis-client-spec.js) ではsinonを使わずに以下のような感じで書いてます。
const Chai   = require('chai');
const Log4js = require('log4js');

const assert = Chai.assert
const expect = Chai.expect
Chai.should()

const FakableRedisClient = require('../src/fakable-redis-client');

Log4js.configure('./test/config/logging.json');
logger = Log4js.getLogger();

// Redis setting for unit test
const hostname = 'sample.host';
const port = 6379;
const password = 'test';
const invalidHostname = '(^_^;)';
const invalidPort = 'abc';

describe('FakableRedisClient', () => {

  describe('constructor', () => {

    it('should set client', () => {
      const client = new FakableRedisClient(hostname, port, password, logger, true);

      client.password.should.equal(password);
      client.client.should.not.be.undefined;
    });

    it('should not set client', () => {
      const client1 = new FakableRedisClient(invalidHostname, port, password, logger, true);
      const client2 = new FakableRedisClient(hostname, invalidPort, password, logger, true);

      client1.password.should.equal(password);
      expect(client1.client).equal(undefined);
      client2.password.should.equal(password);
      expect(client2.client).equal(undefined);
    });

  });

  describe('auth', () => {
    it('should success authentication', (done) => {
      const client = new FakableRedisClient(hostname, port, password, logger, true);

      client.auth((e) => {
        expect(e).equal(null);
        done();
      });
    });
  });

  describe('set', () => {
    it('should get abcdef0', (done) => {
      const testKey = 'test';
      const testValue = 'abcdef0';
      const client = new FakableRedisClient(hostname, port, password, logger, true);

      client.set(testKey, testValue);
      client.get(testKey, (e, result) => {
        result.should.equal(testValue);
        done();
      });
    });
  });

  describe('expire', () => {
    it("shouldn't get the value after 1.1 sec", (done) => {
      const testKey = 'test';
      const testValue = 'abcdef0';
      const expireSec = 1;
      const client = new FakableRedisClient(hostname, port, password, logger, true);

      client.set(testKey, testValue);
      client.expire(testKey, expireSec);
      setTimeout(() => {
        client.get(testKey, (e, result) => {
          expect(result).equal(null);
          done();
        });
      }, 1100);
    });
  });

});
KeyValueReaderクラス
次はKeyValueReaderクラスです。このクラスは、tsvファイルからKeyとValueのペアを読み込むということだけをします。(key-value-reader.js)
const Fs = require('fs');
const Lazy = require('lazy');

class KeyValueReader {

  /**
   * Set file path
   * @param {string} filePath - set file path to read
   */
  constructor(filePath) {
    this.filePath = /^[0-9a-zA-Z/_.-]+$/.test(filePath) ? filePath : '';
  }

  /**
   * Read each lines and run function
   * @param {Object} processFunc - function which is called for each lines
   * @param {Object} callback - function which is called at the end
   */
  executeForEach(processFunc, callback) {
    let processLineNum = 0;
    const readStream = Fs.createReadStream(this.filePath, { bufferSize: 256 * 1024 });

    try {
      new Lazy(readStream).lines.forEach((line) => {
        let skipFlg = false;

        // Get key value
        const keyValueData = line.toString().split('\t');
        const key = keyValueData[0];
        const value = keyValueData[1];
        if (!/^[0-9a-z]+$/.test(key) || !/^[0-9a-z]+$/.test(value)) skipFlg = true;

        processLineNum += !skipFlg ? 1 : 0;
        processFunc(key, value, processLineNum, skipFlg);
      }).on('pipe', () => { callback(null, processLineNum) });
    } catch (e) {
      callback(e);
    }
  }
}

module.exports = KeyValueReader;
ファイルを読むときは、いつもlazyを使って一行ずつ処理しています。そして、テストしやすいように読み込んだ後は引数で渡された関数を実行するようにしています。(key-value-reader-spec.js)
const Chai   = require('chai');
const Log4js = require('log4js');

const assert = Chai.assert
const expect = Chai.expect
Chai.should()

const KeyValueReader = require('../src/key-value-reader');

Log4js.configure('./test/config/logging.json');
logger = Log4js.getLogger();

const filePath = './test/data/key-value.dat';
const invalidFilePath = 'f(^o^;)';

describe('KeyValueReader', () => {

  describe('constructor', () => {
    it('should set filePath', () => {
      const reader = new KeyValueReader(filePath);

      reader.filePath.should.equal(filePath);
    });

    it('should not set filePath', () => {
      const reader = new KeyValueReader(invalidFilePath);

      reader.filePath.should.equal('');
    });
  });

  describe('executeForEach', () => {
    it('should call callback without err', (done) => {
      const reader =new KeyValueReader(filePath);
      const expected = [
        {'key' : 'abc', 'value' : '123', 'skipFlg' : false, 'processLineNum' : 1},
        {'key' : 'm(_ _)m', 'value' : 'orz', 'skipFlg' : true, 'processLineNum' : 1},
        {'key' : 'def', 'value' : '456', 'skipFlg' : false, 'processLineNum' : 2},
        {'key' : '012', 'value' : 'xyz', 'skipFlg' : false, 'processLineNum' : 3}
      ];

      let counter = 0;
      processFunc = (key, value, processLineNum, skipFlg) => {
        key.should.equal(expected[counter]['key']);
        value.should.equal(expected[counter]['value']);
        skipFlg.should.equal(expected[counter]['skipFlg']);
        processLineNum.should.equal(expected[counter]['processLineNum']);
        counter += 1;
      };

      reader.executeForEach(processFunc, () => { done(); } );
    });
  });
});
実行用シェルスクリプトの用意
開発が終わったら、本番用に以下のようなスクリプトを用意します。
GCが走らなくてメモリが足りなかったりしたりするので、実際にスクリプトを実行するときには以下のような設定を入れています。
#!/bin/bash
source ~/.bashrc
nvm use v6.9.1
cd /path/to/appdir
node --optimize_for_size --max_old_space_size=8192 --gc_interval=1000 ./src/update-mapping.js --env $1 $2
そして、以下のようなコマンドを実行して確認した後、
$ ./update-mapping.sh staging --fakeredis >> ./log/update-mapping.log 2>&1
$ cat ./log/update-mapping.log
Now using node v6.9.1 (npm v3.10.8)
[2016-12-22 12:24:30.234] [INFO] [default] - [Option]
[2016-12-22 12:24:30.239] [INFO] [default] -   > targetEnv : staging
[2016-12-22 12:24:30.240] [INFO] [default] -   > fakeRedisFlg : true
[2016-12-22 12:24:30.246] [INFO] [default] - START  ALL
[2016-12-22 12:24:30.250] [INFO] [default] - START  Redis Authentication
[2016-12-22 12:24:30.308] [INFO] [default] - FINISH Redis Authentication
[2016-12-22 12:24:30.308] [INFO] [default] - START  Upload Key-Value Data
[2016-12-22 12:24:30.317] [WARN] [default] -   > Skip : key=> key-m(_ _)m value=> orz
[2016-12-22 12:24:30.318] [INFO] [default] - 10 'are processed...'
[2016-12-22 12:24:30.322] [INFO] [default] - FINISH Upload Key-Value Data
[2016-12-22 12:24:30.322] [INFO] [default] - Finished to insert: 10
[2016-12-22 12:24:30.322] [INFO] [default] - FINISH ALL
cronにコマンドとlogrotate設定を仕込んでいます。
Jenkinsでカバレッジを見る
バッチの書き方とはあまり関連がありませんが、ユニットテスト部分も紹介したので延長線上でJenkinsでユニットテストの実行とカバレッジの測定の設定も簡単に紹介したいと思います。
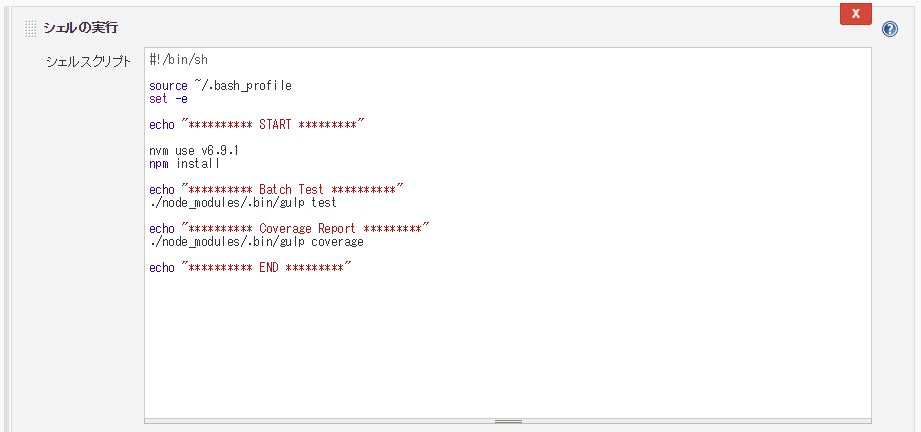
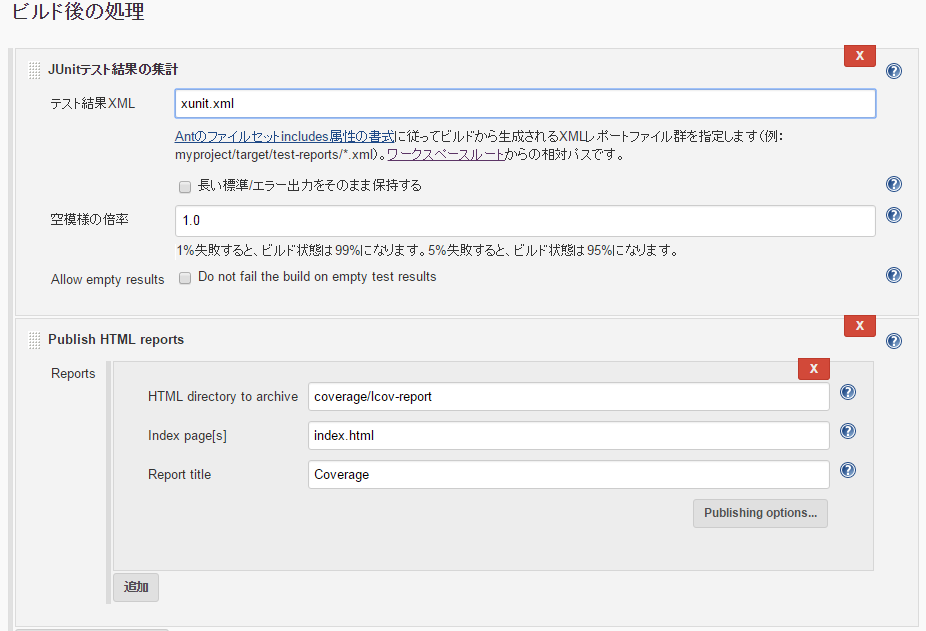
ユニットテストとカバレッジの取得方法はgulpでタスク登録してあるので、以下のような設定でそれぞれ実行するだけです。

ユニットテストは”JUnitテスト結果の集計”、カバレッジは”Publish HTML Reports”で以下のように設定します。

後はビルドを実行させると以下のようにレポートが見れます。


最後のカバレッジレポートのコードは今回のコードではなく、以前書いたものです。
おわりに
今のところこのやり方が一番しっくり来ていますが、もっといい方法があったら乗り換えたいと思っています。
自己流の改善の余地がふんだんにあるコードですが、何らかの参考になれば幸いです。

In this awesome scheme of things you actually secure a B+ for effort. Where you actually confused me personally ended up being on your specifics. As people say, details make or break the argument.. And it could not be more correct in this article. Having said that, allow me inform you precisely what did give good results. Your writing is actually really engaging and this is probably why I am making the effort to comment. I do not really make it a regular habit of doing that. Next, although I can easily notice a jumps in reasoning you make, I am not really confident of just how you seem to connect your points that make the conclusion. For right now I shall yield to your point however trust in the foreseeable future you actually connect the dots better.