はじめに
この記事はScala Advent Calendar 2016の21日目の記事です。
解決したい問題
PaaSをよく利用するのですが、デプロイ先を分散させたりIaaSでサーバ管理をしたくない時に、バッチ処理もPaaS上で動かしたくなります。
指定したい実行タイミングは以下の2つです。
- 定期実行
- リクエスト駆動実行
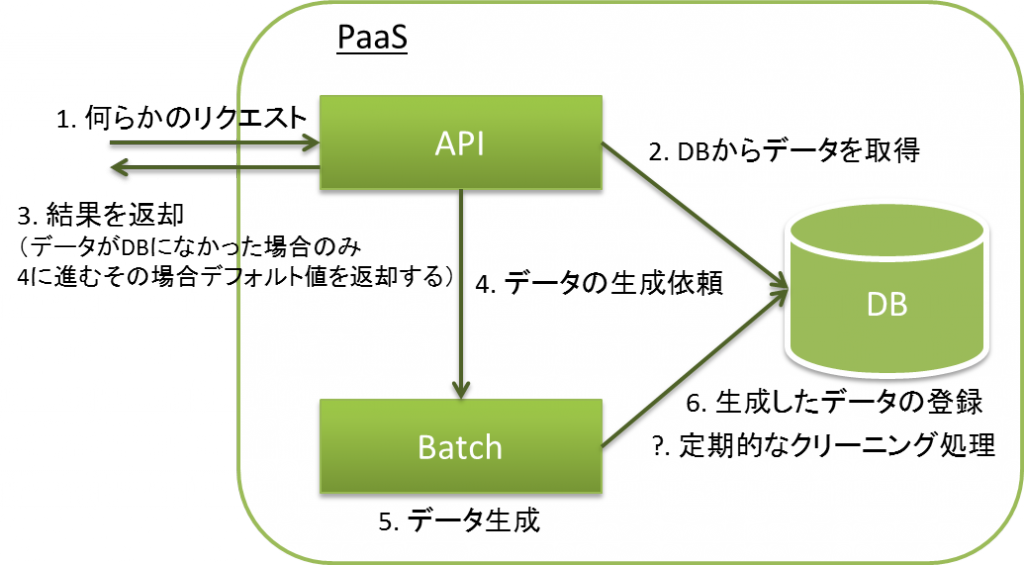
これができれば例えば次の図のようなシステムがPaaSだけで構築出来ます。

この記事ではそれぞれの実行方法でバッチをPaaS上で実行させる方法を書きます。
解決方法
定期実行
akka-quartz-schedulerを使います。
これを使うとcrontabのように*/10 * * ? * * (毎10秒ごとに処理する)という風に実行スケジュールを書くことが出来ます。
リクエスト駆動実行
これは、Akkaを使って、応答は一瞬で返して後は裏で処理を進める形で実現出来ました。
以降で実際のコードを紹介します。
ちなみに、この記事の内容のGitリポジトリは以下です。
環境
この記事で利用している各ソフトウェアのバージョンは以下のとおりです。
- Java : 1.8.0_111
- Scala : 2.11.8
- Sbt : 0.13.3
- Play : 2.5.10
- akka-quartz-schedulear : 1.6.0-akka-2.4.x
- cloudfoundry : v2
準備
まず、play frameworkのプロジェクトの雛形を準備します。
これは以下のようにPlay Example ProjectsのページからPlay 2.5.x Starter Projectsを取ってきました。
wget -O play-scala.zip "https://example.lightbend.com/v1/download/play-scala"
unzip play-scala.zip
rm play-scala.zip
mv play-scala batch-sample
ls batch-sample
#app build.sbt conf LICENSE manifest.yml project public README sbt sbt.bat sbt-dist test
定期実行
まず、akka-quartz-schedulerを使うためにbuild.sbtを編集します。
name := """batch-sample"""

version := "1.0-SNAPSHOT"

lazy val root = (project in file(".")).enablePlugins(PlayScala)

scalaVersion := "2.11.8"

libraryDependencies += jdbc
libraryDependencies += cache
libraryDependencies += ws
libraryDependencies += "org.scalatestplus.play" %% "scalatestplus-play" % "1.5.1" % Test
libraryDependencies += "com.enragedginger" %% "akka-quartz-scheduler" % "1.6.0-akka-2.4.x"
次にコンフィグファイルにcronの実行タイミングの設定を書きます。
実際には環境ごとに分けたりすると思うので、application.confに直に書くのではなく、production.confに書くことにします。
# Cron
akka {
  quartz {
    schedules {
      ClearDB {
        description = "Clear old DB records"
        expression = "*/10 * * ? * *"
        timezone = "Asia/Tokyo"
      }
    }
  }
}
定期的にDBの古いレコードを削除するようなcronジョブという体で、ClearDBという名前にしました。
実行タイミングは*/10 * * ? * *なので、毎10秒毎に実行されます。
application.confの中でこのproduction.confを読み込むようにするために以下の1行を先頭に記述します(実際は先頭である必要はありません)。
include "production.conf"
次にコードを書いていきます。まずは実際の処理を行うActorからです。
package models

import akka.actor.Actor
import play.api._
import play.api.Play.current
import play.api.libs.json._
import play.api.Logger

class ClearDBActor extends Actor {

  def receive = {
    case msg:String => {
      Logger.info("Old DB records were cleared.")
    }
  }
}
簡単のためにログを出力するだけにしています。
次はこのActorとproduction.confのcron設定を紐付けるserviceを書きます。
package services

import javax.inject.{ Inject, Singleton }
import play.api.libs.concurrent.Akka
import akka.actor.{Props, Actor, ActorRef, ActorSystem}
import com.google.inject.ImplementedBy
import scala.concurrent.ExecutionContext.Implicits.global
import play.api.inject.ApplicationLifecycle
import scala.concurrent.Future
import com.typesafe.akka.extension.quartz.QuartzSchedulerExtension

import models.ClearDBActor

@ImplementedBy(classOf[CronJob])
trait Cron

@Singleton
class CronJob @Inject() (system: ActorSystem, lifeCycle: ApplicationLifecycle) extends Cron {
  import scala.concurrent.duration._

  val ClearDBActor = system.actorOf(Props(classOf[ClearDBActor]))
  QuartzSchedulerExtension(system).schedule("ClearDB", ClearDBActor, "")
}
最後のQuartzSchedulerExtensionのところで、production.confに書いたClearDBという名前とActorを紐付けています。
今度はこのCronJobを起動時に実行させるための設定を書きます。
まずapp/Module.scalaの最後に、他と同じようにCronJobの設定を書きます。
import com.google.inject.AbstractModule
import java.time.Clock

import services.{ApplicationTimer, AtomicCounter, Counter, Cron, CronJob}

/**
 * This class is a Guice module that tells Guice how to bind several
 * different types. This Guice module is created when the Play
 * application starts.

 * Play will automatically use any class called `Module` that is in
 * the root package. You can create modules in other locations by
 * adding `play.modules.enabled` settings to the `application.conf`
 * configuration file.
 */
class Module extends AbstractModule {

  override def configure() = {
    // Use the system clock as the default implementation of Clock
    bind(classOf[Clock]).toInstance(Clock.systemDefaultZone)
    // Ask Guice to create an instance of ApplicationTimer when the
    // application starts.
    bind(classOf[ApplicationTimer]).asEagerSingleton()
    // Set AtomicCounter as the implementation for Counter.
    bind(classOf[Counter]).to(classOf[AtomicCounter])

    // For clean DB
    bind(classOf[Cron]).to(classOf[CronJob]).asEagerSingleton()
  }

}
Moduleに追記することで、リクエストが来たときではなく起動時にcronの設定ができるようになります。
...
play.modules {
  # By default, Play will load any class called Module that is defined
  # in the root package (the "app" directory), or you can define them
  # explicitly below.
  # If there are any built-in modules that you want to disable, you can list them here.
  #enabled += my.application.Module
  enabled += Module

  # If there are any built-in modules that you want to disable, you can list them here.
  #disabled += ""
}
...
これで記述は終わりなので、PaaS上で実行してみます。
今回はCloudfoundry v2を使うので、以下のようなコマンドを叩くと実行できます。
./sbt dist
cf push batch-sample -p target/universal/batch-sample-1.0-SNAPSHOT.zip -b https://github.com/cloudfoundry/java-buildpack.git
cf logs batch-sample
#2016-12-19T06:21:30.00+0900 [App/0] OUT [info] application - Old DB records were cleared.
#2016-12-19T06:21:40.00+0900 [App/0] OUT [info] application - Old DB records were cleared.
#2016-12-19T06:21:50.00+0900 [App/0] OUT [info] application - Old DB records were cleared.
最後に3行分実行ログを載せました。ちゃんと10秒毎に実行されています。
リクエスト駆動実行
ここではリクエストが来た時に裏側に処理を渡して、返却元にすぐ返答をする仕組みを作ってみます。
まずは、コントローラを修正します。パスに何も記述しない場合は、HomeControllerが呼ばれるので、HomeControllerを修正します。
package controllers

import javax.inject._
import play.api._
import play.api.mvc._

import akka.actor.{Props, Actor, ActorRef, ActorSystem}
import javax.inject._
import play.api._
import play.api.mvc._
import scala.concurrent.{ExecutionContext, Future, Promise}
import scala.concurrent.duration._

import play.Logger
import akka.util.Timeout
import models.{ManagerActor, WorkRequest}

/**
 * This controller creates an `Action` to handle HTTP requests to the
 * application's home page.
 */
@Singleton
class HomeController @Inject() extends Controller {

  /**
   * Create an Action to render an HTML page with a welcome message.
   * The configuration in the `routes` file means that this method
   * will be called when the application receives a `GET` request with
   * a path of `/`.
   */
  val system = ActorSystem("MainSystem")
  val actor = system.actorOf(Props(classOf[ManagerActor]))
  def index = Action { implicit request =>
    implicit val timeout = Timeout(5.seconds)

    try {
      var getParams: Map[String,String] = request.queryString.map { case (k,v) => k -> v.mkString }
      actor ! WorkRequest(getParams)
    } catch {
      case e: Exception => {
        Logger.error(e.toString())
      }
    }

    // Return immediately
    Ok("")
  }

}
やっていることはすごく単純で、Actorを生成してGetパラメタをMapにして渡しています。
そして、その後すぐに空を返却します。
こうすることで、リクエスト元はバッチに対して作業依頼だけをしてすぐ他の処理をすることが出来ます。
バッチもActorに処理依頼を出しているだけなので、Actorが重い処理をする場合でも、すぐに空レスポンスを返すことが出来ます。
気をつける必要があるのは、処理スピード<依頼スピードとなった場合、Actorのメールボックスが溢れてしまうことです。
次は、Controllerで使っているManagerActorとWorkRequestの記述です。
package models

case class WorkRequest(getParams: Map[String,String])
WorkRequestはただのMapを持つcase classです。
Actorへのメッセージ形式を定義する目的で作りました。
次はManagerActorです。
ManagerActorではパフォーマンスを上げるために、3つのワーカーActorを生成して、ラウンドロビンで依頼を渡しています。
package models

import akka.actor.Actor
import play.api._
import play.api.Play.current
import akka.actor.actorRef2Scala
import akka.actor.ActorSystem
import akka.actor.Props
import akka.actor._
import akka.util.Timeout
import akka.routing.RoundRobinPool
import akka.routing._
import akka.actor.OneForOneStrategy
import akka.actor.SupervisorStrategy._
import scala.concurrent.duration._
import scala.concurrent._
import ExecutionContext.Implicits.global

import models.WorkRequest

class ManagerActor extends Actor with ActorLogging {
  implicit val timeout = Timeout(5.seconds)

  // Retry strategy
  val mySupervisorStrategy = OneForOneStrategy(
      maxNrOfRetries = 10,
      withinTimeRange = 3.seconds
    ){
      case _ => Restart
    }

  // Child actors
  val workerActors = context.actorOf(Props(classOf[WorkerActor]).withRouter(RoundRobinPool(3, supervisorStrategy = mySupervisorStrategy)))

  def receive = {
    case msg:WorkRequest => workerActors ! msg
    case _  =>
  }
}
ManagerActorも実際の処理は行わず、3つのワーカーActorに処理を移譲しています。
実際にこの仕組を利用したときは、ManagerActorに依頼と処理のスピードを監視する機構も持たせていました。
最後にWorkerActorを書きます。
package models

import akka.actor.Actor
import play.api._
import play.api.Play.current

import scala.concurrent._
import scala.concurrent.duration.Duration
import play.api.libs.concurrent.Execution.Implicits._
import play.Logger
import akka.util.Timeout
import akka.actor._

import models.WorkRequest

class WorkerActor extends Actor {

  def receive = {
    case WorkRequest(getParams) => {
        Logger.info("Worker : " + getParams.toString)
    }

    case _ =>
  }
}
WorkerActorでようやく実際の処理を行いますが、ここでは簡単のためにログの出力だけしています。
処理の内容によっては、Actorをフルに使ったり、Futureを使ったりして、並列に処理させることで高速化できます。その際、PlayのAkkaの設定を変えてチューニングすることで、そこからさらにパフォーマンスを上げたりすることも出来ます。
実行してみます。
./sbt dist
cf push batch-sample -p target/universal/batch-sample-1.0-SNAPSHOT.zip -b https://github.com/cloudfoundry/java-buildpack.git
cf logs batch-sample
#2016-12-19T07:13:10.00+0900 [App/0] OUT [info] application - Old DB records were cleared.
#2016-12-19T07:13:15.00+0900 [App/0] OUT [info] application - Worker : Map()
#2016-12-19T07:13:20.00+0900 [App/0] OUT [info] application - Old DB records were cleared.
#2016-12-19T07:13:30.00+0900 [App/0] OUT [info] application - Old DB records were cleared.
#2016-12-19T07:13:32.71+0900 [App/0] OUT [info] application - Worker : Map(test -> 1)
#2016-12-19T07:13:38.50+0900 [App/0] OUT [info] application - Worker : Map(test -> 1, hoge -> fuga)
#2016-12-19T07:13:40.00+0900 [App/0]      OUT [info] application - Old DB records were cleared._
Getパラメタつきでバッチにアクセスすると、このようなログが得られます。
定期的な処理をしつつ、リクエストが来たら裏での処理も行っています。
さいごに
実際にこの仕組みを利用したところ、IaaS環境を使わなくていい分、サーバのコストもサーバの管理コストも少し安くなりました。
