Background
I could write program which draws cube on marker yesterday, so I’ll write program which draws 3d model.
Implementation
I’ll use
MQOViewer library to load and draw MQO type 3D model.
I downloaded 3D model from
here.
The source code is following.
import javax.media.opengl.*;
import processing.opengl.*;
import jp.nyatla.nyar4psg.*;
import processing.video.*;
import jp.nyatla.kGLModel.*;
import jp.nyatla.kGLModel.contentprovider.*;

Capture cam;
MultiMarker ar;
int id;
KGLModelData model_data;
ContentProvider content_provider;

void setup() {
  size(640, 480, OPENGL);
  cam = new Capture(this, width, height);
  ar = new MultiMarker(this, width, height, "camera_para.dat", NyAR4PsgConfig.CONFIG_PSG);
  id = ar.addARMarker("patt.hiro", 80);

  // Load 3D Model
  content_provider = new LocalContentProvider(this, dataPath("plant.mqo"));
  PGraphicsOpenGL pgl = (PGraphicsOpenGL)g;
  GL gl = pgl.beginGL();
  model_data = KGLModelData.createGLModelPs(
    this, gl, null,
    this.content_provider,1.0,
    KGLExtensionCheck.IsExtensionSupported(gl,
    "GL_ARB_vertex_buffer_object"),
    true);
  pgl.endGL();
}

void draw() {

  if (cam.available() == false) return;
  cam.read();
  background(0);
  ar.drawBackground(cam);
  ar.detect(cam);

  if (ar.isExistMarker(id)) {
    ar.beginTransform(id);
      PGraphicsOpenGL pgl = (PGraphicsOpenGL)g;
      GL gl = pgl.beginGL();

        gl.glTexEnvf(GL.GL_TEXTURE_ENV, GL.GL_TEXTURE_ENV_MODE, GL.GL_MODULATE);
        gl.glEnable(GL.GL_CULL_FACE);
        gl.glCullFace(GL.GL_FRONT);

        // Light Setting
        mySetLight(gl, 0, -100, 100);

        // Arrange 3D model's direction
        gl.glRotatef(90, 1, 0, 0);
        gl.glRotatef(180, 0, 1, 0);

        model_data.draw();
      pgl.endGL();
    ar.endTransform();
  }
}

// Light Setting
void mySetLight(GL gl, float x, float y, float z) {
  float[] light_diffuse =  { 0.2, 0.2, 0.2, 1.0 };
  float[] light_specular = { 0.3, 0.3, 0.3, 1.0 };
  float[] light_ambient =  { 0.3, 0.3, 0.3, 0.1 };
  float[] light_position = { x, y, z, 0.0 };

  gl.glLightfv(gl.GL_LIGHT0, gl.GL_DIFFUSE, light_diffuse, 0);
  gl.glLightfv(gl.GL_LIGHT0, gl.GL_SPECULAR, light_specular, 0);
  gl.glLightfv(gl.GL_LIGHT0, gl.GL_AMBIENT, light_ambient, 0);
  gl.glLightfv(gl.GL_LIGHT0, gl.GL_POSITION, light_position, 0);
  gl.glShadeModel(gl.GL_SMOOTH);
  gl.glEnable(gl.GL_LIGHT0);
  gl.glEnable(gl.GL_LIGHTING);
}
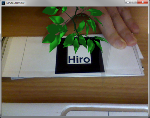
Result

Easy to write with processing.