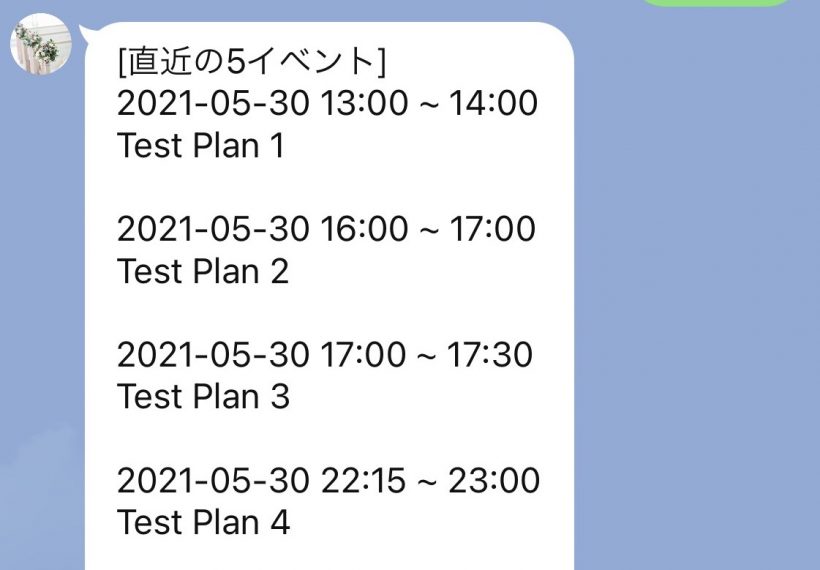
トップのスクリーンショットにあるように、自分の Google Calendar にある直近の予定を Bot (Python) で取得しようと思いやり方を調べていました。
しかし、意外にも Python でバックエンドから自分のカレンダーの予定を取得する方法について直接的に解説しているサイトがなく、実現に少し時間がかかってしまいました。
自分の備忘録として、そして同じことをやりたい人のために、私がやった方法を紹介しようと思います。
手順
1. Google Cloud Platform アカウントを作成する。
Google Cloud Platform のアカウントを持っていない場合は作成してください。
これについてはネット上にたくさん記事があるので、行き詰まることはないかと思います。
2. Google Cloud Platform 上で Google Calendar API を有効にする。
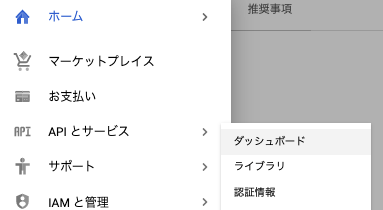
Google Cloud Platform 上で左上の三本線をクリックして、「API とサービス」から「ダッシュボード」をクリックしてください。
「API とサービスの有効化」をクリックしてください。

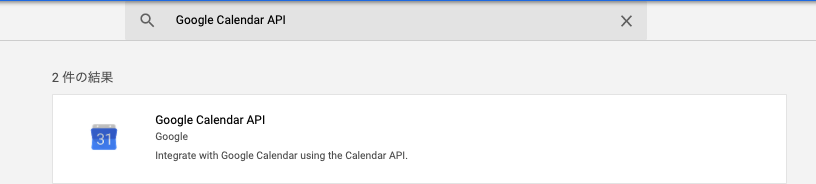
検索窓に「Google Calendar API」を入力して、「Google Calendar API」が出てきたらそれを選択し、飛んだ先で「有効にする」ボタンをクリックしてください。
3. Google Cloud Platform 上でサービスアカウントを作成する。
サービスアカウントは Google Cloud Platform の公式ドキュメントによると以下のようなアカウントのようです。
サービス アカウントは人間以外のユーザーを表します。これは、カスタム アプリケーションなどのワークロードで、エンドユーザーの関与なしにリソースにアクセスする場合や、アクションを実行する必要がある場合を対象としています。 サービス アカウントは、通常のユーザー アカウントと次の点で異なります。
・パスワードが設定されていないため、ブラウザベースのログインには使用できません。
・Google Cloud プロジェクトに属するリソースとして作成され、管理されます。これに対して、ユーザーは Cloud Identity または Google Workspace のアカウントで管理されます。
・Google Cloud に固有です。一方、Cloud Identity または Google Workspace で管理されるユーザーは、Google の多数のプロダクトとサービスで動作します。サービス アカウントの使用と管理のベスト プラクティス
https://cloud.google.com/iam/docs/best-practices-for-using-and-managing-service-accounts
今回は Python スクリプトから Google Calendar API を呼び出すので、人間以外のユーザーになります。
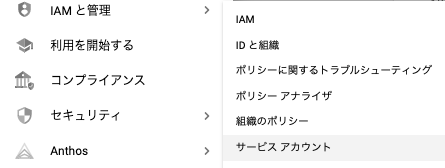
Google Cloud Platform 上で左上の三本線をクリックして、「IAM と管理」から「サービスアカウント」をクリックします。
「サービスアカウントの作成」をクリックします。

サービスアカウント名を入力して、「作成」ボタンをクリックします。
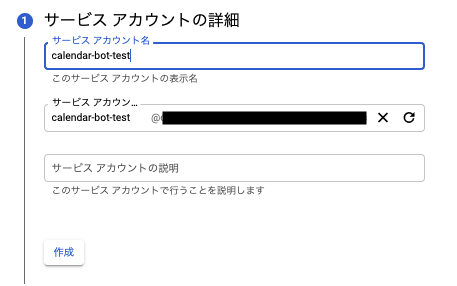
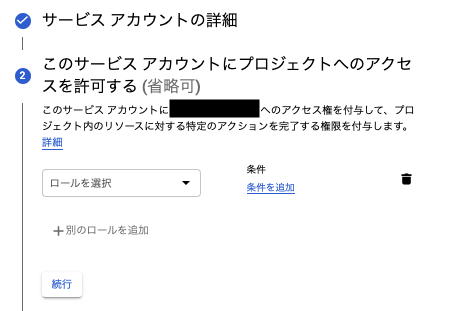
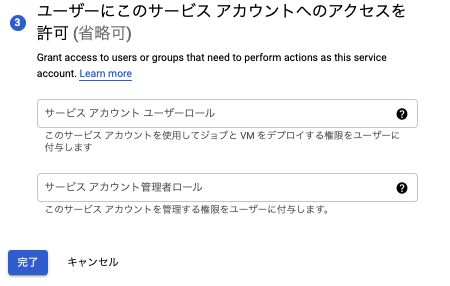
後は省略可なので、今回はお試し用ということで特に指定無しで「続行」、そして「完了」ボタンをクリックしてください。
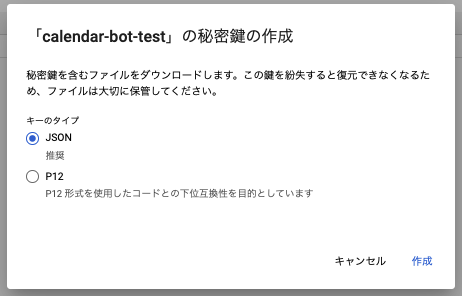
4. サービスアカウントの鍵を作成する。
3 で「完了」ボタンをクリックした後の画面で、「操作」から「鍵を管理」をクリックしてください。

「新しい鍵を作成」をクリックしてください。
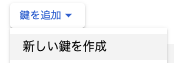
キーのタイプは「JSON」のまま、「作成」ボタンをクリックしてください。その後、鍵を保存する画面になるので、鍵を保存してください。この鍵を Python スクリプトで利用します。
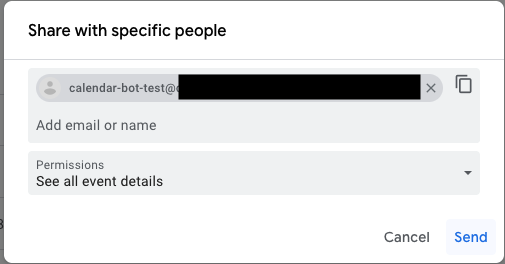
5. サービスアカウントを Google Calendar のカレンダーの共有設定に入れる。
「IAM と管理」の「サービスアカウント」の画面から、サービスアカウントのメールアドレスをコピーしてください。
その後、Google Calendar を開いて、左下の対象のカレンダーの三点から「Settings and sharing」をクリックしてください。

「Share with specific people」から「Add people」ボタンをクリックしてください。

サービスアカウントの E メールアドレスを入力して、「Permissions」を「See all event details」のままにして、「Send」ボタンをクリックしてください。
6. Python スクリプトを書く。
これでようやく準備が整いましたので、Google Calendar API を使って、手順 5 で設定したカレンダーの予定を取得する Python スクリプトを作成します。
なお、Python のバージョンは 3.7.9 で、pip のバージョンは 21.1.2 です。
google-api-python-client と google-auth をインストールします。
pip install google-api-python-client google-auth
Python スクリプトは以下です。calendar_id は手順 5 の「Settings and sharing」をクリックした後の画面の「Integrate calendar」にあります。そして、credentials.json はサービスアカウントの鍵です。
import datetime, re
import googleapiclient.discovery
import google.auth

# Preparation for Google API
SCOPES = ['https://www.googleapis.com/auth/calendar.readonly']
calendar_id = 'xxxxx'
gapi_creds = google.auth.load_credentials_from_file('credentials.json', SCOPES)[0]
service = googleapiclient.discovery.build('calendar', 'v3', credentials=gapi_creds)

# Get events from Google Calendar API
now = datetime.datetime.utcnow().isoformat() + 'Z'
events_result = service.events().list(
     calendarId=calendar_id, timeMin=now,
     maxResults=5, singleEvents=True,
     orderBy='startTime').execute()

# Pick up only start time, end time and summary info
events = events_result.get('items', [])
formatted_events = [(event['start'].get('dateTime', event['start'].get('date')), # start time or day
     event['end'].get('dateTime', event['end'].get('date')), # end time or day
     event['summary']) for event in events]

# Generate output text
response = '[Closest 5 events]\n'
for event in formatted_events:
     if re.match(r'^\d{4}-\d{2}-\d{2}$', event[0]):
         start_date = '{0:%Y-%m-%d}'.format(datetime.datetime.strptime(event[1], '%Y-%m-%d'))
         response += '{0} All Day\n{1}\n\n'.format(start_date, event[2])
     # For all day events
     else:
         start_time = '{0:%Y-%m-%d %H:%M}'.format(datetime.datetime.strptime(event[0], '%Y-%m-%dT%H:%M:%S+09:00'))
         end_time = '{0:%H:%M}'.format(datetime.datetime.strptime(event[1], '%Y-%m-%dT%H:%M:%S+09:00'))
         response += '{0} ~ {1}\n{2}\n\n'.format(start_time, end_time, event[2])
response = response.rstrip('\n')
print(response)
これを実行すると以下のようになります。
$ python get_events.py
[Closest 5 events]
2021-05-30 19:00 ~ 20:00
Test Event 1

2021-05-30 20:45 ~ 21:00
Test Event 2

2021-05-30 21:30 ~ 22:00
Test Event 3

2021-05-30 23:15 ~ 01:00
Test Event 4

2021-06-01 All Day
Test Event 5
これで完成です。